
This is a quick tutorial how to set up your PI as a SDR which collects ADS-B messages from planes and shares them with FlightAware, Flightradar24 and planefinder.
Installing minibian on the PI
I am using minibian for the Raspberry Pi. This is basically a stripped down Raspbian with only a minimal set of packages installed. But of course you can also use other Raspbian distributions.
Go ahead and download minibian and install it to the SD card. For Windows users I recommend using Rufus. Linux users can use the dd installation method.
For this tutorial I used version 2016-03-12-jessie-minibian
Enlarge partition after the installation
Follow the minibian tutorial on how to enlarge the partition to use the whole SD card.
Update your installation
It is a good idea to update everything after the installation. Log in as root (since there are no other users yet) and do:
apt-get update
apt-get dist-upgrade
Create a user
Now you should create a user for you to work with instead of always being root. You probably also want to install sudo.
Connect your RTL2832U + R820T2 DVB-T stick
Do not forget to connect your DVB stick and check if it was recognized by the pi. You shoud see something like this in dmesg
rr@minibian:~$ dmesg
...
[ 4.262962] usb 1-1.2: New USB device found, idVendor=0bda, idProduct=2838
[ 4.271883] usb 1-1.2: New USB device strings: Mfr=1, Product=2, SerialNumber=3
[ 4.281146] usb 1-1.2: Product: RTL2838UHIDIR
[ 4.287334] usb 1-1.2: Manufacturer: Realtek
[ 4.293407] usb 1-1.2: SerialNumber: 00000001
...
Installing FlightAware’s PiAware
You can just follow the short tutorial from FlightAware on how to install PiAware. It basically boils down to:
wget http://de.flightaware.com/adsb/piaware/files/packages/pool/piaware/p/piaware-support/piaware-repository_3.0.5_all.deb
sudo dpkg -i piaware-repository_3.0.5_all.deb

sudo apt-get update
sudo apt-get install piaware dump1090-fa

sudo piaware-config allow-auto-updates yes
sudo piaware-config allow-manual-updates yes

sudo reboot
Obviously you do not need the sudo if you are logged in as root.
After the installation you should be able to access your device via: http://minibian:8080 (replace minibian with the ip of your Pi). This will send you to http://minibian/dump1090-fa/.
If you are not able to reach your Pi this way, have a look if lighttpd is running and also if an Apache is running. The running Apache might hinder lighttpd from using port 80. In this case you can either stop Apache or reconfigure both services in a way that they can co-exist.
If your antenna is set up niceley you should be able to see some planes:
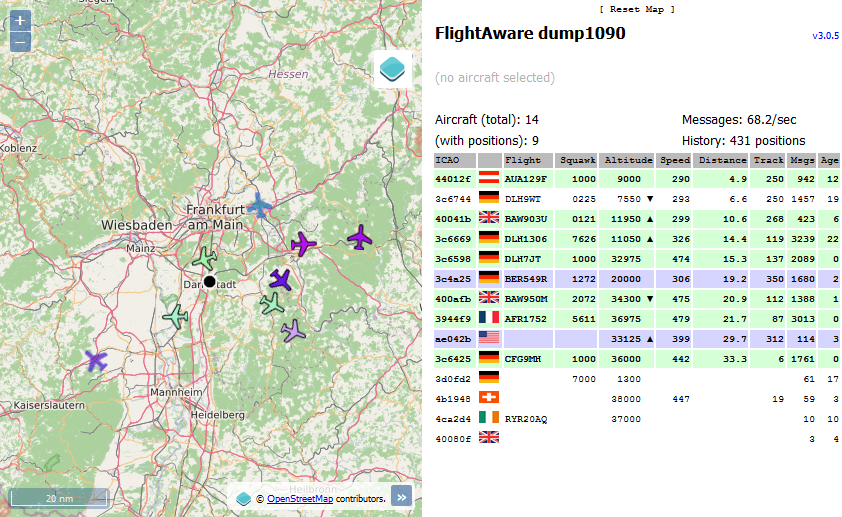
dump1090-fa running on the Pi showing some planes
Claiming your Pi
Now you need to create an account at FlightAware and claim your Pi. If you are on a home network and your PC and the Pi are behind the same NAT, claiming is simple.If your Pi has a different public IP it is a little more complicated. The easiest way is to claim it from the Pi itself. But since we do not want to install a GUI and a browser on the Pi you can use your Pi as a SOCKS proxy.
Be aware that FlightAware takes some time to process your claim. They state that your Pi will appear within minutes on their website, but for me it took roughly one day.
Using your Pi as SOCKS proxy with PuTTY
Just set these settings in PuTTY and click Add.

Now you can set the SOCKS proxy in your browser to point to localhost:8080 and all your traffic will go through your Pi.
Set your exact location in FlightAware to activate MLAT
You should set your exact position on the FlightAware website (https://flightaware.com/adsb/stats/user/<your user name>) in order to enable MLAT.
You can be sure that MLAT is working if you see a plane which is a little grayed out. When you click on it is shows MLAT in the position row.
Installing the Flightradar24 feeder
The Flightradar24 installation is even simpler since they provide a script for that. Is is just this command and following the setup instruction on screen:
sudo bash -c "$(wget -O - http://repo.feed.flightradar24.com/install_fr24_rpi.sh)"
During the setup you will be asked for your receiver. Do not select DVB-T stick but select AVR (TCP). Please enter: localhost:30002 as Host/IP.
You should also turn MLAT off because FlightAware is already doing it. Flightradar has a rather strange own MLAT implementation which does not feed the restults back to you. Some people also reported problems with having Flightradar and FlightAware MLAT turned on simultaneously.
If everything worked you should be able to connect to http://minibian:8754/ and see your tracked aircrafts.
This installed version Linux/generic/armv7l/1.0.18-7 on my Pi.
During the first setup which I did on windows I had the problem that it did not accepted my location coordinates. If that happens, just pick a nearby airport (EDDF for Frankfurt International in my case) and write their support an email and ask them to correct your location.
Installing Plane Finder feeding software
Download the .deb package for the Plane Finder feeder with wget and install it with dpkg (please check their website for newer versions and change the commands accordingly).
wget http://client.planefinder.net/pfclient_3.4.61_armhf.deb
sudo dpkg -i pfclient_3.4.61_armhf.deb
Now follow the link to the config website, which is usually http://minibian:30053/.
As receiver data format you should choose Beast and the network settings should be 127.0.0.1 as IP and 30005 as port.
The map view is currently broken since google maps now needs an API key and they did not adapt to that change yet. You can follow the discussion on their forum.
Conclusion
This is it. You now have a premium account at each page and a nice ADS-B receiver to look at.
Here is a summary of the pages you can access on your Pi:
Raw output from dump1090-fa (useful to see if you are receiving something)
Status pages:
- Flightradar24 feeder status: http://minibian:8754/
- Plane Finder status: http://minibian:30053/
- dump1090-da page with map and planes: http://minibian/dump1090-fa/